
Presentations in a browser
By Bob Mesibov, published 29/05/2017 in Tutorials
If you've ever given a slide presentation at a conference, you know the drill. Tell the audio-visual people what session your talk is in, then hand them a USB stick with your PowerPoint on it. The presentation has to be in Microsoft PowerPoint because the one and only laptop plugged into the data projector runs Windows and PowerPoint. No LibreOffice Impress, no other presentation software, sorry.
Alternative to...
Of course, if you do your presenting from your own computer, there are a couple of dozen free and proprietary alternatives to PowerPoint. But you already have a presentation application on your computer! And I mean almost any computer, including the laptop used at that conference. It's called a browser.
The idea of presenting Web pages as slides has been around for at least 20 years, and some basic advantages were obvious from the beginning. Could webpages contain text that's formatted any way you like? Yes. Images, too? Yes. Audio and video? Yep. Links or buttons or icons to navigate through a presentation? Easy.
The world of Web-based presentations has boomed in the last 20 years, and the many choices for presentation-building in 2017 include:
There's also at least a dozen tools for building slideshows directly in HTML and CSS, usually with an assist from JavaScript:
- CSSS
- Deck.js
- DZSlides
- Fathom.js
- Flowtime.js
- Impress.js
- jmpress.js
- Remark.js
- Reveal.js
- S5
- Slippy
- Stack
Most of the latter projects have online demos. There are even ways to build slideshows for the browser with pure HTML and CSS and no JavaScript at all. This no-script demo by Ondřej Žára is particularly impressive.
Online archiving
A live presentation is ephemeral. How can you save it online for future viewing?
One way is to make a video of the presentation for Vimeo or YouTube. We've all seen videos of live talks, where the camera view alternates between the projected slide and the moving, talking presenter. You can also record your desktop, adding voice-over commentary to a video of static images of slides; this method used to be (still is?) popular with university lecturers.
In my opinion, these are examples of information bloat. Videos are multi-multi-megabyte files, and the core information in the presentations (the static images, slide text and commentary text) rarely amounts to more than a few megabytes. It's also hard to navigate in a video of a slide presentation. (At how many minutes and seconds was that slide you wanted to look at again?)
A more data-light and navigable way to archive is to put the whole slide deck online as separate slides or as a PDF, and services like SlideBoom and SlideShare exist for just that purpose.
None of these archiving methods really takes full advantage of Web technologies, and if all you wanted to do was put some slides on the Web for sharing, why not build a good-looking presentation using one of the online services, like Google Slides?
A road less travelled
But there's another way to archive a presentation online, one closer to the Web's roots: build a single webpage containing the slides as click-to-enlarge thumbnails, with commentary as text next to each thumbnail. The whole presentation is available at a glance on the one page and navigation is easy.
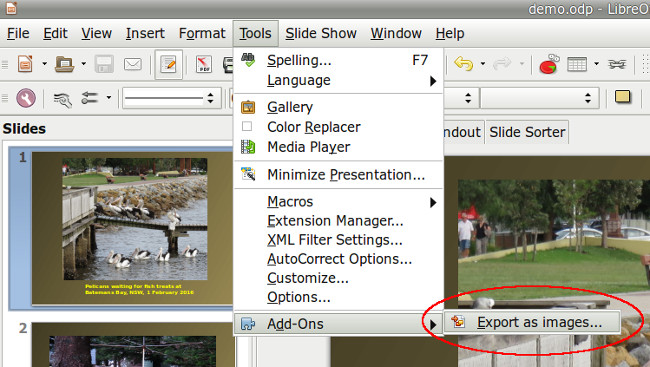
To turn a LibreOffice Impress presentation into images ready for "Webbing", first download and install the excellent Export As Images extension for LibreOffice, written by the Ukrainian developer Sergii Kuznietsov. I use version 0.9.3, released 3 April 2016.
My demo presentation has just two slides. In my LibreOffice version 4.3, I access the "Export As Images" extension through the Tools/Add-Ons menu:
The extension offers a number of exported image formats in colour or grayscale and you can adjust both image size and image quality:
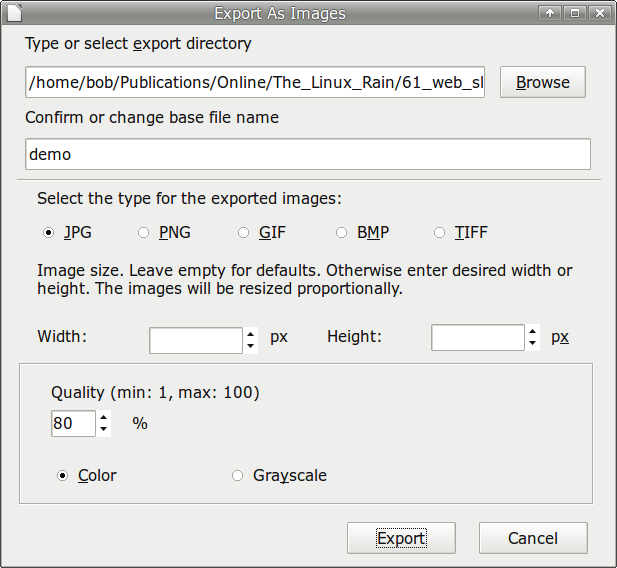
I choose JPEG at 80%, and for the enlarged set of slide images I enter a width of 600 pixels, which at the 4:3 standard slide ratio will give me a set of 600x450 px .jpg files. These are named with the Impress .odp filename as a base by default, so the extension exports demo - 1.jpg and demo - 2.jpg. I rename these to demo_1.jpg and demo_2.jpg because the next set of exports will otherwise have the same names.
That next set of exports is the thumbnails, for which I choose a width of 240 px (240x180 px images). These are renamed demo_1_thumb.jpg and demo_2_thumb.jpg
I can now build a simple webpage:
<!DOCTYPE html>
<html lang="en">
<head>
<title>1-page archiving demo</title>
<meta charset="UTF-8">
<meta name="keywords" content="Impress, Linux Rain,archiving" />
<style>
html { font-size:80%;font-family:Verdana,Arial,Helvetica,sans-serif; }
td { width:280px;vertical-align:top; }
.enlarge { position:relative;z-index:0; }
.enlarge span { display:none; }
.enlarge:hover span { display:block;position:absolute;top:30px;left:250px; }
</style>
</head>
<body>
<h2>Suburban wildlife</h2>
<table>
<tr>
<td><a class="enlarge" href="#"><img src="demo_1_thumb.jpg" width="240" height="180" alt="thumbnail1" ><span><img src="demo_1.jpg" width="600" height="450" alt="enlarged1" /></span></a>
</td>
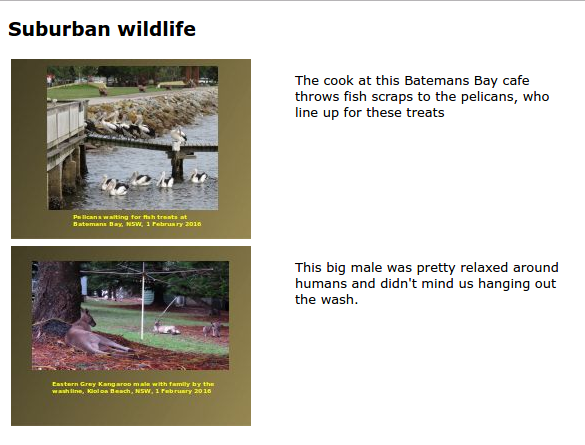
<td><p>The cook at this Batemans Bay cafe throws fish scraps to the pelicans, who line up for these treats</p>
</td>
</tr>
<tr>
<td><a class="enlarge" href="#"><img src="demo_2_thumb.jpg" width="240" height="180" alt="thumbnail2" ><span><img src="demo_2.jpg" width="600" height="450" alt="enlarged2" /></span></a>
</td>
<td><p>This big male was pretty relaxed around humans and didn't mind us hanging out the wash.</p>
</td>
</tr>
</table>
</body>
</html>The result is simple and neat:
The enlarging trick I use doesn't involve clicking on the thumbnail, although you could code that if you prefer. I like "appear on hover" in CSS, using the styling shown in the page code (the "enlarge" class).
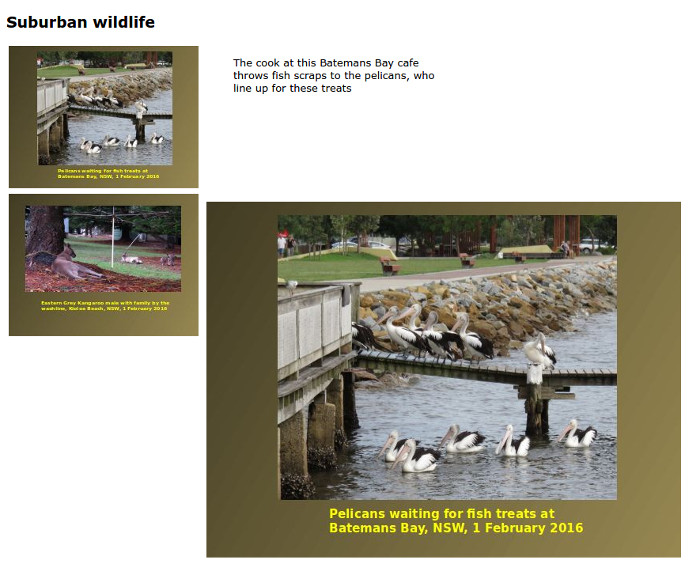
I've adjusted the "appear on hover" position to suit my thumbnail and text sizes, so that the enlarged image appears to the right of the thumbnail and below the text. When you archive a presentation on a webpage you have a lot of scope for adjustments: table and table cell size, thumbnail size, enlarged image size, enlarged image position. And in this particular case, the total size of page code and images is only 116 kB, compared to 508 kB for the Impress file.